Overnight New York Style Bagel Recipe

This post may contain affiliate links. We only promote products we actually use and truly love!
We spent years perfecting this overnight bagel recipe to yield the perfect New York style chewy-yet-fluffy texture and buttery flavor with just 7 ingredients. It only takes 30 minutes to make the dough the night before and they’ll make your kitchen smell incredible!

If you’ve ever had a New York style bagel, you know they’re something special. They’re dense and chewy yet somehow light and airy at the same time, with just the right amount of crunch to the outside – and the best flavor. They make the best bacon egg and cheese sandwiches, and they’re irresistible with a schmear of jalapeno salsa cream cheese.
What To Expect
We hope you love this recipe!
If you give it a try, please let us know what you think by leaving a rating and review. We read and reply to every single comment!
We adapted this recipe from Sophisticated Gourmet (you can find the original here – it’s very detailed and turns out great) with years of testing and tweaking. I can’t even count the number of bagels we ate to get to this final recipe! We wanted more flavor, more chew, and larger bagels than the original recipe produced – all important qualities of our favorite New York style bagels.
To achieve these results, we add more yeast and sea salt for flavor; increase the kneading time to yield denser, chewier results; split our dough into 6 bagels instead of 8; and brush our bagels with melted butter for a deliciously buttery finish. We also implemented a few tricks that we’ve learned from years of baking bread and pizza dough, like measuring ingredients by weight instead of volume for more consistent results and resting the dough under a warm, damp towel to improve fermentation.
So when we say this recipe is tried and true, we mean it!
Why We Love This Recipe
It only takes about 30 minutes to make the dough at night, and the next morning it doesn’t take much hands-on time to shape and boil the bagels before baking. This recipe is surprisingly low-effort for how incredible the bagels taste!
– nicole
Suggested Schedule
If you want to eat fresh bagels for breakfast or brunch, you’ll need to time this recipe according to your schedule. Here’s what we usually do:
- 8:00 PM (the night before): Make the dough and refrigerate overnight.
- 8:00 AM: Take the dough out of the fridge to warm up.
- 8:30 AM: Punch down the dough and let it rest.
- 8:40 AM: Divide, shape, and rest.
- 9:00 AM: Boil and add toppings.
- 9:10 AM: Bake.
- 9:40 AM: Cool (if you can be patient!).
- 10 AM: Slice and enjoy!
Adjust this schedule to whenever you’d like the bagels to be ready, and they’ll turn out perfectly.
Key Ingredients
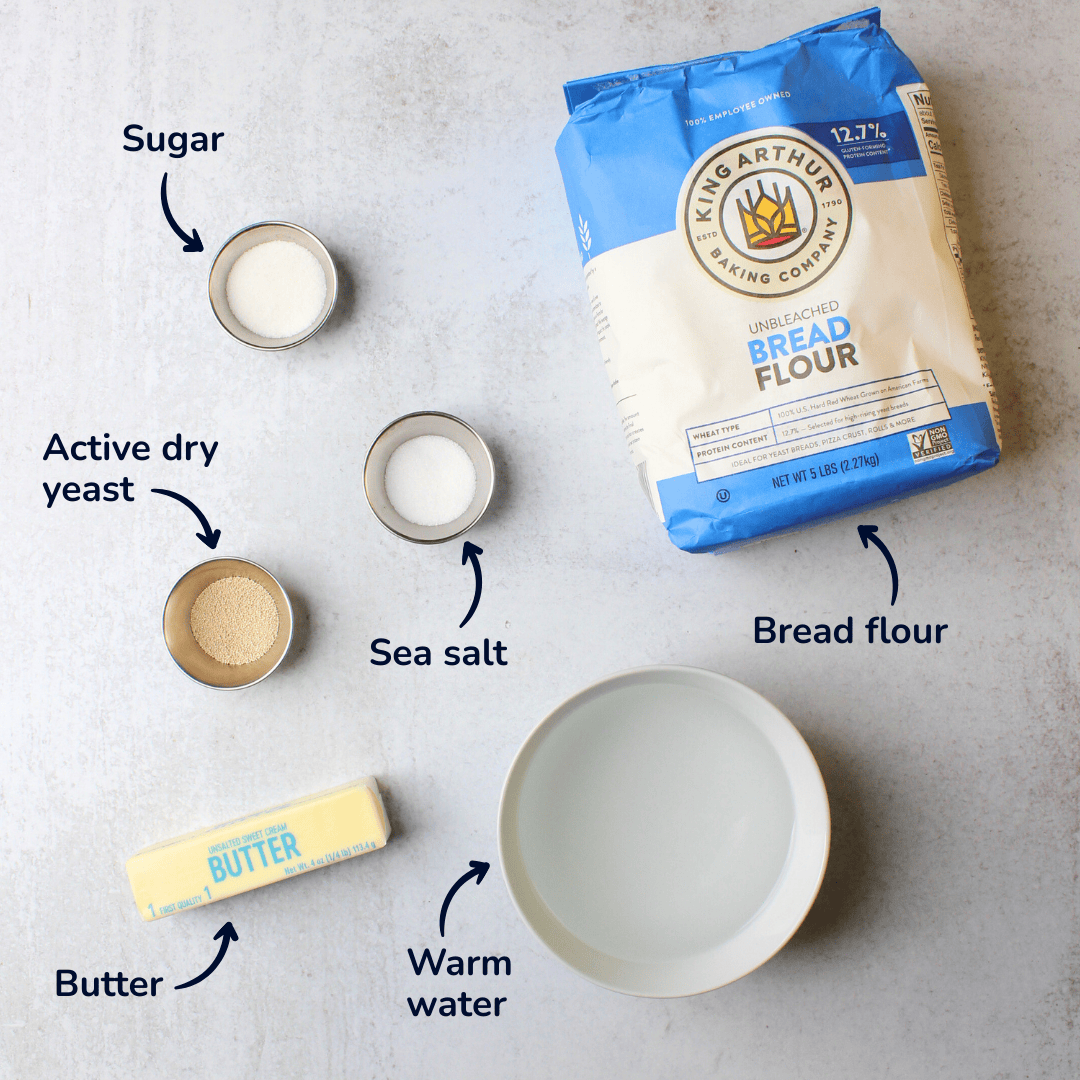
- Active dry yeast – Bagels need yeast to rise. You can buy packets or jars of active dry yeast at the store in the baking aisle – we prefer Red Star Yeast. One batch of this recipe uses one 7 gram packet, so you won’t have to measure it or end up with a half-used packet.
- Bread flour – This type of flour has a higher protein content than all-purpose flour, which means it can develop more gluten. More gluten means a chewier texture, which is what makes New York style bagels so iconic! We always use King Arthur flour for its premium quality and extra-high protein content.
- Fine sea salt – Skip the table salt and use the good stuff in these bagels – you’ll taste the difference. We find sea salt adds the right punch of flavor that’s found in most New York style bagels.
- Butter – Many bagel recipes use an egg wash, but we found that brushing the bagels with melted butter before they bake yields a beautiful texture and color plus a savory, buttery flavor that infuses itself into every bite. Far superior to an egg wash, in our opinion!
- Optional toppings – Try sesame seeds, everything bagel seasoning, or asiago cheese. Get creative!
See the recipe card for full information on ingredients and quantities.
Essential Equipment
You’ll need a few different kitchen tools to make bagels at home:
- Kitchen scale – This will help you accurately measure ingredients by weight, not by volume.
- Digital thermometer – You’ll want to measure the temperature of the water to make sure it’s warm, but not too hot for the yeast to survive in it.
- Stand mixer – We don’t recommend kneading bagel dough by hand, as it’s a lengthy process and you’ll get much more consistent results by using a stand mixer.
- Rubber spatula – Not entirely necessary, but helpful for coaxing the dough together when you first turn on the mixer.
- Bench knife – To help you divide the dough before shaping. If you do any kind of bread-making on a regular basis, this is definitely worth the minor investment.
- Spider strainer or large slotted spoon – Essential for boiling the bagels without burning your fingers!
- Pastry brush – We recommend a silicone one to brush melted butter over the bagels before baking.
- Cooling rack – You’ll want to transfer the bagels to a cooling rack immediately after baking so they can cool evenly and retain their crunchy crust.
How To Make Overnight Bagels

Stage 1: Make the bagel dough and rest overnight.
Step 1: Add 120g of the warm water to a bowl, then sprinkle in the sugar and yeast. Let sit for 5 minutes to activate (you don’t need to stir it).
Step 2: Add the bread flour and sea salt to the bowl of a stand mixer. Whisk to combine, then make a well in the center. Gently stir the yeast and sugar mixture until it fully dissolves in the water, then pour it into the well with another 70g of warm water.
Step 3: Using the dough hook attachment, mix the dough on low speed with a stand mixer. Add the rest of the water to the dough as needed until a moist but firm dough has formed. You may need to scrape the sides of the bowl with a rubber spatula to help incorporate the flour.
Steps 4-5: Knead the dough on low speed (around 2 or 3) for 15 minutes until it’s smooth and elastic. This will form the gluten, which yields the signature chewy texture of New York style bagels.
Step 6: Lightly brush a large bowl with vegetable oil and transfer the dough ball to the bowl. Roll the dough around to coat it in oil, then cover the bowl tightly with plastic wrap and refrigerate overnight. Make sure the bowl is large enough to allow the dough to double in size.

Stage 2: Cut, shape, and proof.
Step 7: In the morning, take the dough out of the fridge and let it come to room temperature by setting it on the counter for about 30 minutes. The dough should have doubled in size after about 11 to 12 hours in the fridge.
Step 8: Once the dough has rested, punch it down and rest another 10 minutes. This step helps remove some of the air bubbles from the dough, yielding a finer grain and more flavor.
Steps 9-10: Transfer the dough to a clean work surface and divide it into 6 equal pieces using a bench knife. Don’t worry about being too gentle with the dough as it’s pretty resilient!
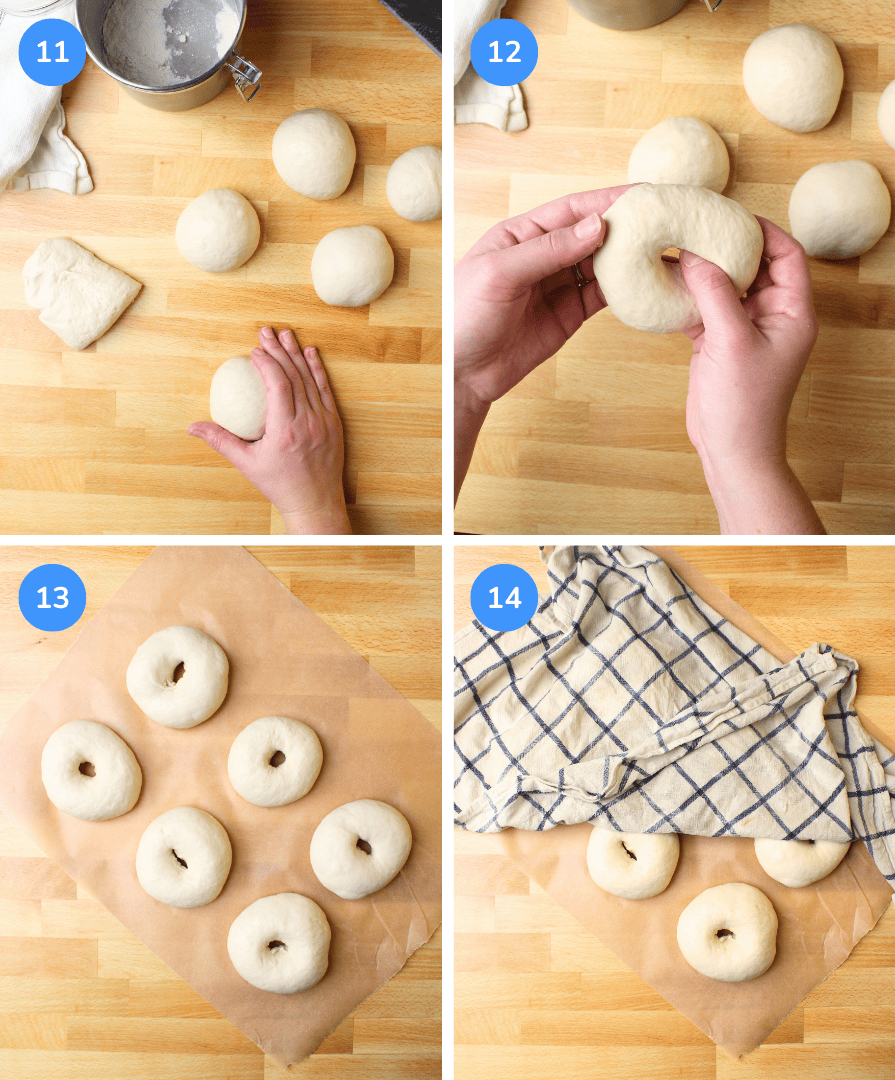
Step 11: Working with one dough ball at a time, shape them into smooth, round balls. Cup one of your hands into a C-shape, place it on top of the dough ball, and roll the dough in a circular motion against the countertop with a bit of pressure until it’s smooth all around.
Step 12: Coat your thumb lightly in flour and poke a hole through the center of each dough ball. Gently coax the hole to about 1 to 2 inches in diameter. Don’t worry if it springs back and becomes smaller when you set the bagel down. The best New York style bagels barely have a hole in the center!
Steps 13-14: Once all the bagels have been shaped, lay them flat on a sheet of parchment paper and cover them with a warm, damp kitchen towel. Rest for 10 minutes before boiling. While the bagels rest, bring a large pot of water to a boil and preheat the oven to 425F. Line a large baking sheet with parchment paper and set aside, somewhere near the pot of water.
Stage 3: Boil, top, and bake.
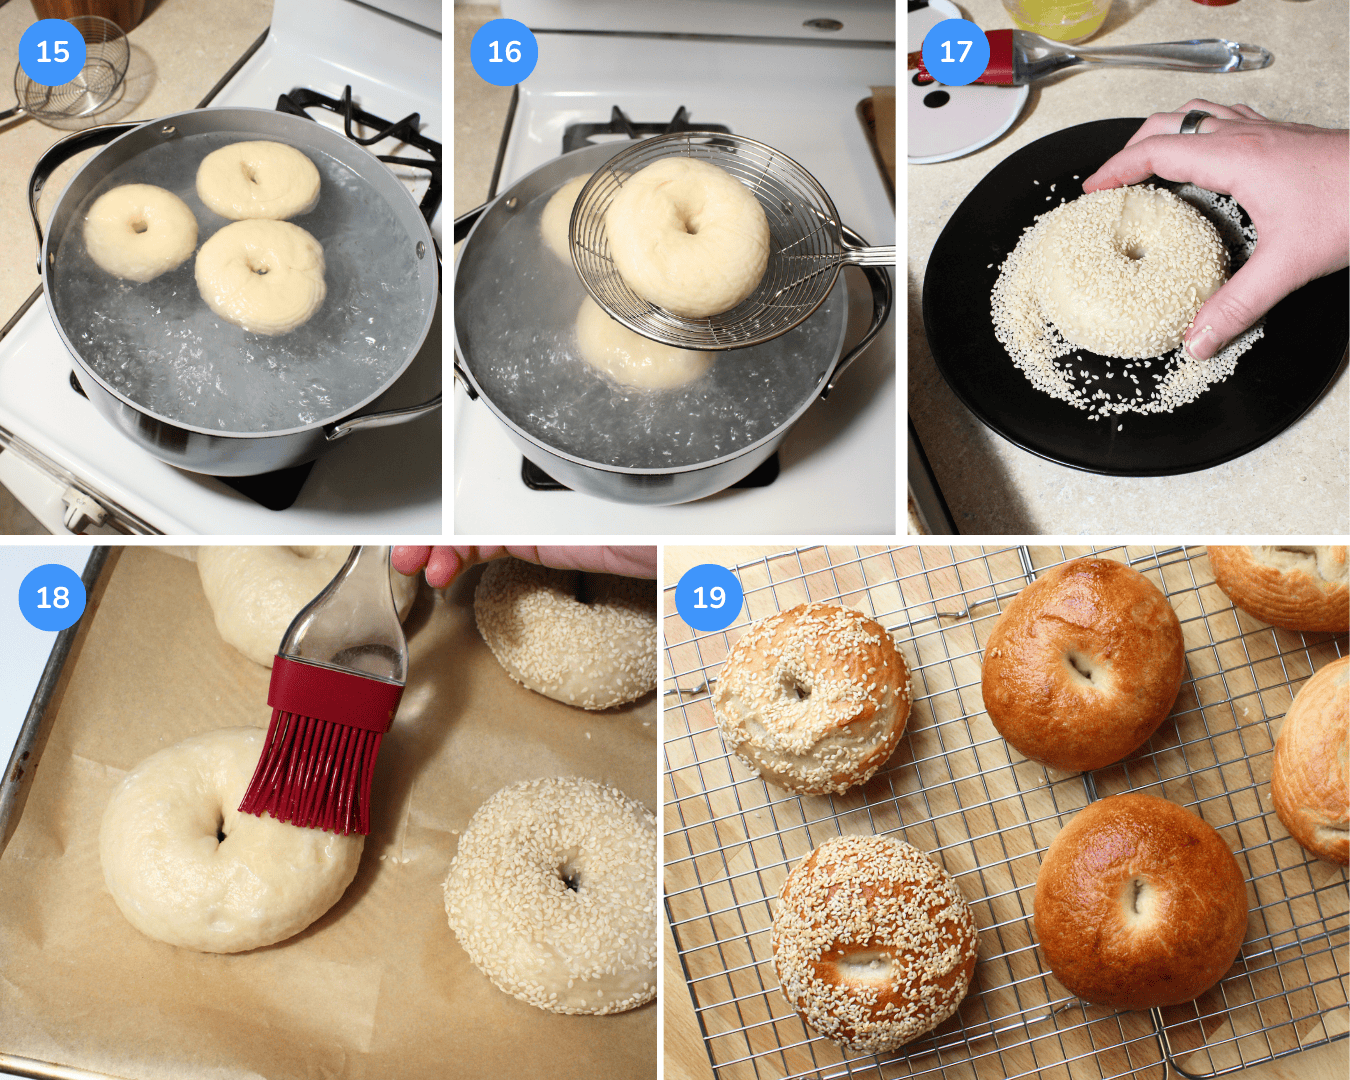
Step 15: Uncover the bagels and gently transfer them into the boiling water in small batches (we like to do 3 at a time). Boil for 2 minutes, flip them over, then boil for another 2 minutes.
Step 16: Using a large spider strainer or slotted spoon, drain each bagel and transfer to the prepared baking sheet. Repeat steps 15 and 16 for the remaining bagels.
Step 17: Optionally add toppings to the bagels – see the section below titled Bagel Toppings: Ideas and Tips for more details.
Step 18: For plain bagels, brush with melted butter.
Step 19: Bake the bagels on the middle rack of the oven until they’re a deep golden-brown, about 30 minutes. Rotate the pan halfway through baking to ensure even browning. Then, let cool on a wire rack for at least 10 minutes before slicing and serving – they’ll be very hot straight from the oven.
Bagel Toppings: Ideas and Tips
Honestly, we love making these bagels plain because the dough is just so flavorful – but they’re also delicious with toppings like sesame seeds, everything seasoning, and jalapeno cheddar!
We tested a bunch of methods to see what helped our toppings stick the best and found that it’ll vary depending on the type of topping you choose. Here are some ideas and tips:
- For plain bagels: Brush generously with melted butter.
- For sesame, everything, poppyseed, or other dry seasonings: Add a pile of the seasonings to a shallow dish. Press the bagel into the dry seasonings, move it around a bit, then flip and repeat to coat both sides (don’t be afraid to be a bit aggressive with this to really help the seasonings embed into the dough). Place the bagel back on the baking sheet and then gently brush with melted butter.
- For asiago, jalapeno cheddar, and other fresh toppings: Brush the bagels generously with melted butter, then carefully place the toppings on the bagel, pressing them into the dough as best as you can.

Expert Tips
Serving Suggestions
Nothing goes better with homemade bagels than homemade flavored cream cheese! Here are some of our favorite flavors to mix up while the bagels are in the oven:
We don’t normally toast the bagels when they’re fresh out of the oven, because they’re already warm and so irresistibly fluffy. But you do you! Just note that if you toast a freshly baked bagel, it’ll toast quicker than a room-temperature bagel because it’s already warm. So keep an eye on it to avoid accidentally burning all your hard work.
We also love to use homemade bagels for sandwiches like this chicken bagel sandwich with cream cheese and our favorite, bacon egg and cheese breakfast sandwiches.

New York Style Bagels FAQs
Related Breakfast Recipes To Try
Love this recipe? You may enjoy these other breakfast recipes, too:


Tell us what you think!
We hope you enjoy this recipe! When you try it out, please leave a review and a star rating in the comments below. Happy cooking! – Nicole and Alex

Overnight New York Style Bagel Recipe
Save this recipe!
Equipment
Ingredients
- 290 grams warm water about 105 degrees F
- 7 grams active dry yeast
- 19 grams granulated sugar
- 440 grams bread flour
- 15 grams fine sea salt
- 1 teaspoon vegetable oil
- 3 tablespoons butter melted
- Optional toppings: sesame seeds, everything bagel seasoning, asiago cheese, etc.
Instructions
Making Bagel Dough
- First, add 120 grams of the warm water to a bowl. Then, add the sugar and yeast and let it sit for 5 minutes – don’t stir it yet.
- While the yeast activates, add the bread flour and sea salt to the bowl of a stand mixer. Whisk by hand to combine, then make a well in the center.
- Next, gently stir the yeast and sugar until it fully dissolves in the water. Pour this into the well with the flour and salt. Then, add another 70 grams of warm water.
- Using the dough hook attachment, turn the stand mixer on low speed (speed 2 or 3). Add the rest of the water (about 100 grams more) to the dough as needed, until a moist but firm dough has formed. You may need to scrape the sides of the bowl with a rubber spatula to help incorporate the flour.
- Continue kneading the dough on low speed for 15 minutes until it’s smooth and elastic. This will form the gluten, which yields the signature chewy texture of New York style bagels.
- Finally, lightly brush a large bowl with vegetable oil and transfer the dough to the bowl. Roll the dough around to coat it in the oil, then cover the bowl tightly with plastic wrap and refrigerate overnight.
Resting
- The next morning, take the bagel dough out of the fridge and let it come to room temperature by setting it on the counter for about 30 minutes. The dough should have doubled in size after about 11 to 12 hours in the fridge.
- After about 30 minutes, punch the dough down and let it rest for another 10 minutes. This will remove some of the air bubbles from the dough, yielding a finer grain and a more flavorful dough.
Shaping and Proofing
- Transfer the dough to a clean work surface. Then, use a bench knife to divide the dough into 6 equal pieces. Don’t worry about being too gentle with the dough as it’s pretty resilient!
- Roll each dough piece into a rough ball. Resize if necessary, transferring dough from larger balls to smaller ones, until they’re all roughly the same size.
- Then, working with one dough ball at a time, shape them into smooth, round balls. Cup one of your hands into a C-shape, place it on top of the dough ball, and roll the dough in a circular motion against the countertop with gentle pressure. Once it’s smooth on all sides, set it to the side and repeat with the remaining dough balls.
- Next, coat your thumb lightly in flour and poke a hole through the center of each dough ball. Gently coax the hole to about 1 to 2 inches in diameter, but don’t worry if it springs back and becomes smaller when you set the bagel down. The best New York style bagels barely have a hole in the center!
- Once all the bagels have been shaped, lay them flat on a sheet of parchment paper and cover them with a warm, damp kitchen towel. Rest for 10 minutes.
Boiling
- While the bagels rest, bring a large pot of water to a boil and preheat the oven to 425 degrees F. Additionally, line a large baking sheet with parchment paper and set aside, somewhere near the pot of water.
- Prepare the melted butter and put any bagel toppings in shallow dishes near the baking sheet. You’ll want all of these ingredients handy once you start to boil the bagels.
- Once the bagels have rested, uncover them and gently transfer them to the boiling water in small batches (we like to do 3 at a time). Boil for 2 minutes, flip them over, then boil for another 2 minutes.
- Using a large spider strainer or slotted spoon, drain each bagel and transfer to the prepared baking sheet. Boil the remaining bagels the same way, then transfer them to the baking sheet.
Topping and Baking
- Now, top the bagels (if desired). The exact method depends on the type of toppings:For plain bagels – Brush with melted butter.For sesame, everything, poppyseed, or other dry seasonings – Add a pile of the seasonings to a shallow dish. Press the bagel into the dry seasonings, move it around a bit, then flip and repeat to coat both sides (don't be afraid to be a bit aggressive to help the toppings stick). Place the bagel back on the baking sheet and then gently brush with melted butter.For asiago, jalapeno cheddar, or other fresh toppings – Brush with melted butter, then carefully place the toppings on the bagel, gently pressing them into the dough as best as you can.
- Bake the bagels for about 25 to 30 minutes on the middle rack of the oven. Rotate the pan halfway through baking to ensure even browning. The bagels should be a deep golden-brown when they’re done.
- Transfer bagels to a cooling rack and let cool for at least 10 minutes before slicing and serving.
Video
Notes
Nutrition
If you have any questions regarding the information presented in this post, please refer to our Nutrition Disclaimer here.
Nicole makes these bagels all the time and there is no better breakfast. Plus they make our home smell SO good while they’re baking.