
How To Make Homemade Corn Tortillas For Tacos

This post may contain affiliate links. We only promote products we actually use and truly love!
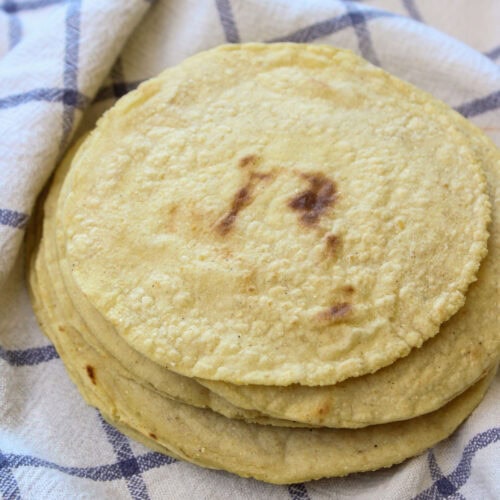
Making homemade corn tortillas from scratch really isn’t as hard as it may seem, in fact, it’s a pretty easy, and super forgiving recipe – even poorly made homemade tortillas are better than what you can buy at the store. And with a little practice, you’ll be making the best corn tortillas you’ve ever had, right at home.
This recipe uses masa harina, water, and salt, along with a tortilla press and cast iron griddle to make twelve 4.5-inch street corn tortillas in 20 minutes.
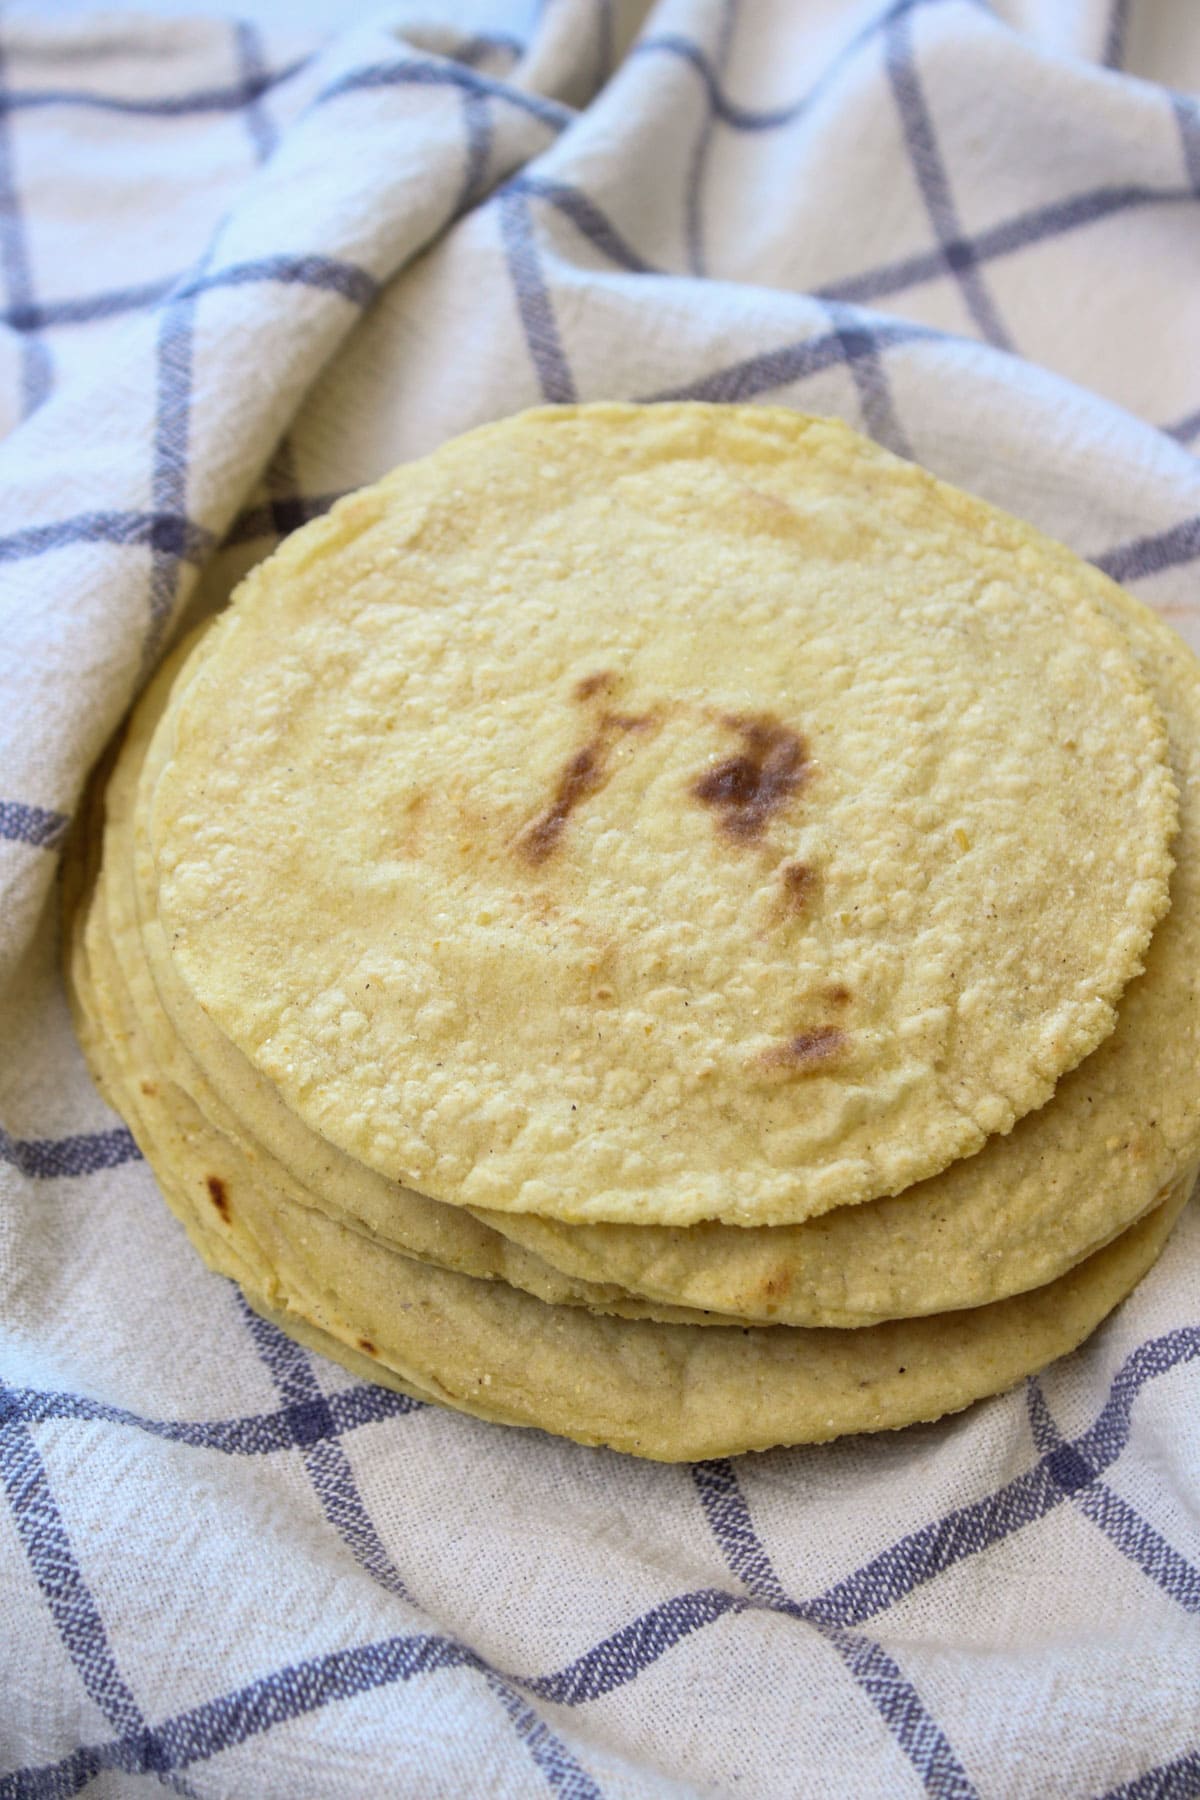
One of the most impactful gifts I have received in my life was a tortilla press and a bag of masa harina. My cousin got it for me for my birthday, and I’m not exaggerating when I say it changed my life.
I didn’t know how much life, love, and flavor I was missing out on without having fresh, homemade corn tortillas on a weekly basis. And if that sounds dramatic, it’s because it was a dramatic change. It’s ruined store-bought corn tortillas, and even some restaurant tacos.
Making corn tortillas from scratch is the single most impactful change we’ve ever made for leveling up our homemade tacos.
And today I want to share with you the gift of making homemade corn tortillas for your taco nights, too.
What To Expect
We hope you love this recipe!
If you give it a try, please let us know what you think by leaving a rating and review. We read and reply to every single comment!
Key Ingredients And Equipment
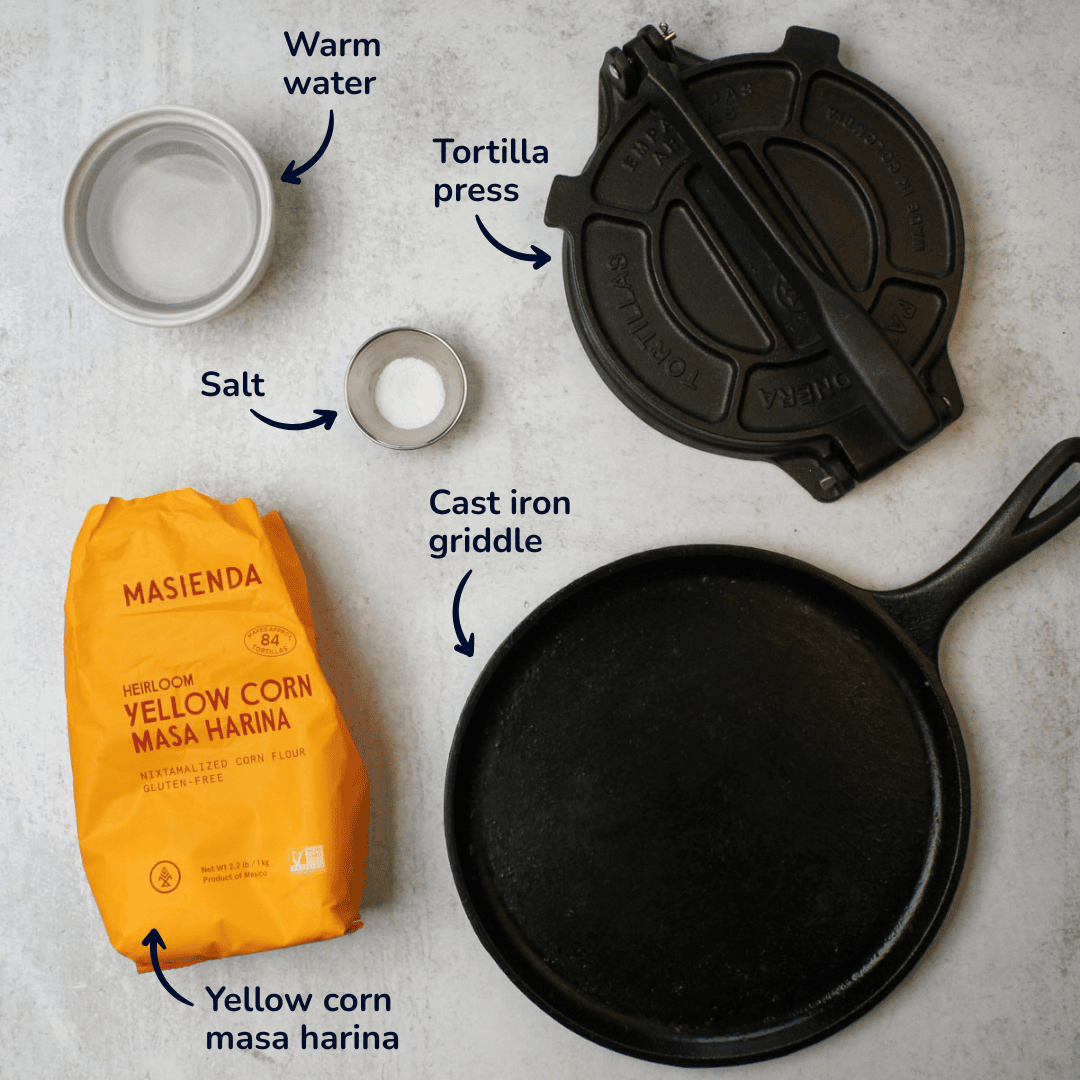
Ingredients
- Masa Harina – a heavy cup, about 130 to 140 grams – We prefer making our corn tortillas with yellow masa harina – we find it has a better taste and texture compared to white masa harina, but everyone has their preferences. We have yet to try making tortillas with blue or red masa harina, but it’s on our list of things to make, and we’ll update this post when we try it. As for brands, masa harina varies a lot from brand to brand. We cannot recommend Masienda masa harina enough, it is by far our favorite brand. Read more why here.
- Warm water – a light cup, about 200 to 210 grams – If you want a temperature to aim for, 100 to 105 degrees F will do, but warm to the touch is good enough.
- Fine sea salt – ½ teaspoon, about 3 grams – Finely ground is the key here. You need something that will mix into the dough well. The type of salt itself is less important. However I prefer the taste of sea salt over table salt.
A note on amounts: I always start with a ratio of 40:60 masa harina to warm water (or 1.5x the weight of masa harina for water). But it’s important to understand that these amounts are just starting points. It’s what I start with every time, but it’s best to adjust the dough to the proper texture as you mix it. Everything from the temperature of the room, the water, the humidity, how much salt you use, and what brand of masa harina you have can affect the consistency of the dough..
Measuring by weight is the best way to get consistency for making tortillas. And once you get used to making them in your kitchen (with your masa harina, water temp, and location), you likely won’t have to adjust your masa much, if at all. If you don’t already have a kitchen scale, we highly recommend getting one – here’s our kitchen scale.
Equipment
- Tortilla press – A tortilla press is a must have if you regularly make tortillas. It’s the best way to easily and constantly press tortillas for the perfect size and thickness. Here is our trusty cast iron tortilla press that we love. Note: if you don’t have a tortilla press yet, check out our FAQ section.
- Parchment paper – A sheet of parchment paper, about 14 inches long, is the easiest way to make sure the tortillas don’t stick to the press. You can also use parchment paper sheets or cut a plastic bag in half and place one half on each surface of the dough balls.
- Cast iron griddle – The perfect pan for cooking tortillas if you don’t have a comal. Here is our cast iron griddle that we use for tortillas, quesadillas, grilled cheeses, searing pork belly, and so much more.
- Metal spatula – Helpful for flipping tortillas on a cast iron pan. Plus metal spatulas help smooth out the cast iron over time making it more nonstick!
- A clean kitchen towel – The best way to keep tortillas warm and soft for serving.
How To Make Corn Tortillas
Making Masa (Tortilla Dough)
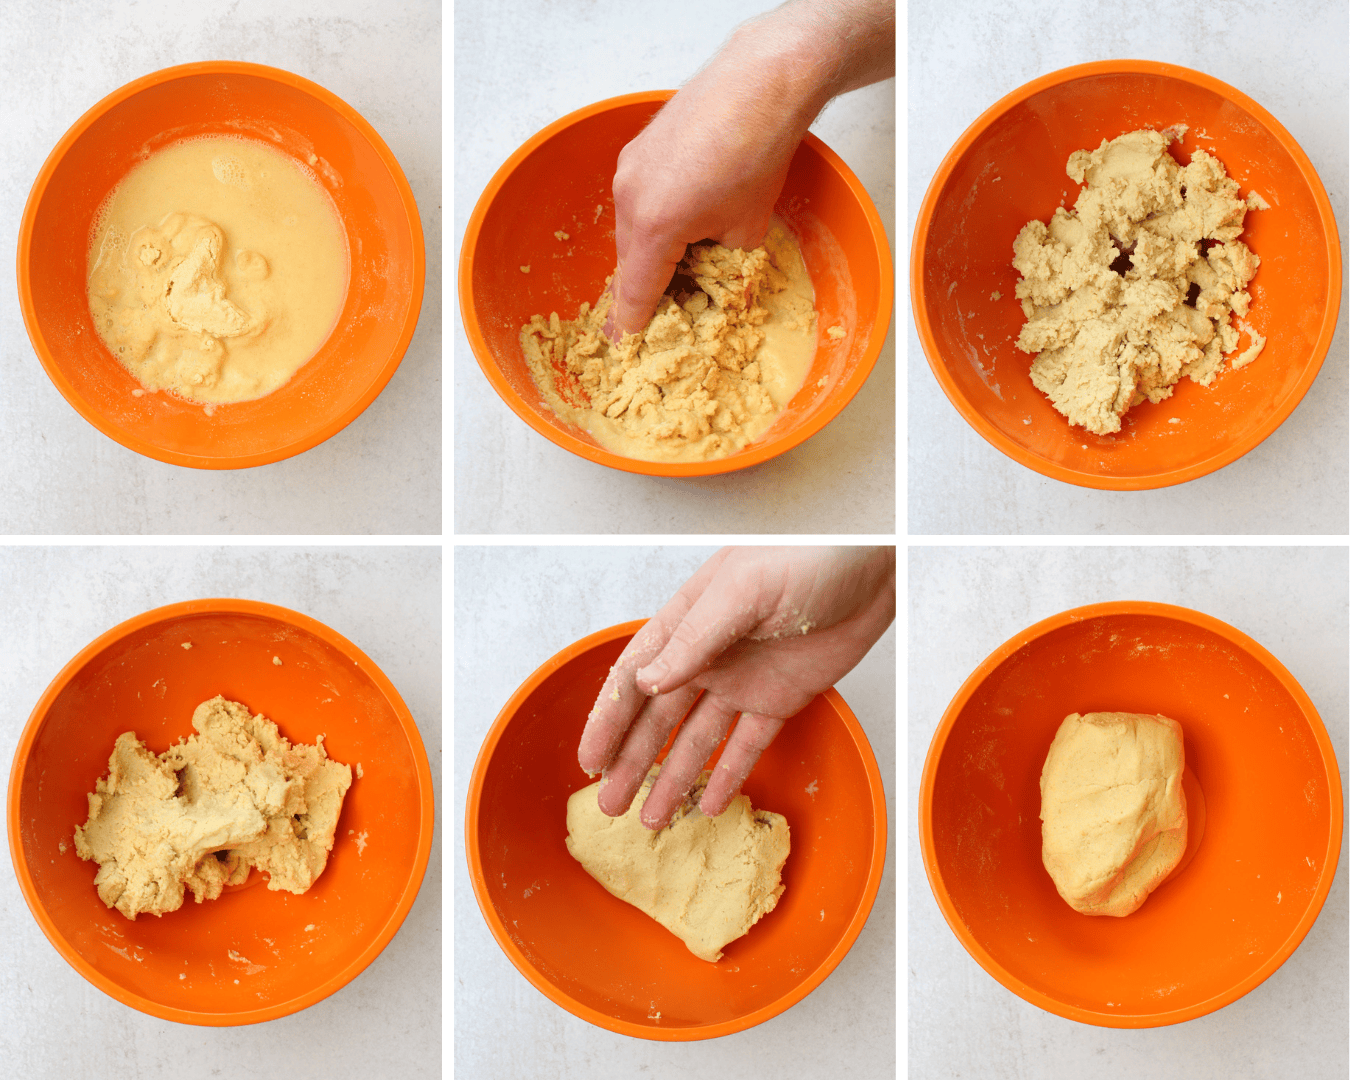
- Combine the masa harina, warm water, and salt in a mixing bowl. Gently mix it using the pincer method – see image below – (shout out to Ken Forkish’s Flour Water Salt Yeast, the best bread book there is). Basically, shape your hand like a crab or lobster claw, and use it to pinch the dough together, rotating it as needed. The dough will first make a crumbly mess as the masa harina hydrates, and the ingredients combine. This will take about 4 to 5 minutes.
- Once the dough has mostly come together, you can press it into a ball.
- Rip off a chunk of masa, roll it into a ball, and press it flat. There should be no cracks.
Pincer Method
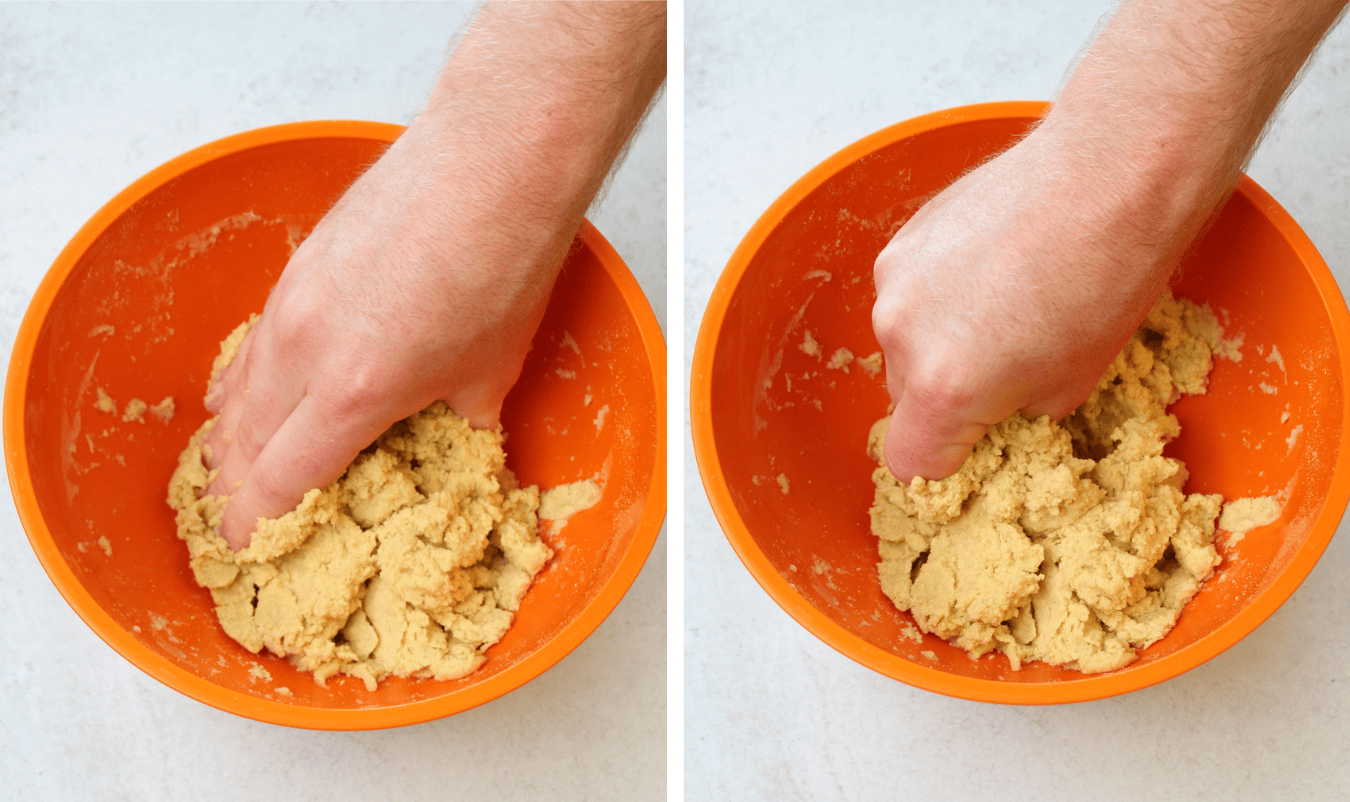
The pincer method is an easy way to mix together dough that I love learned from bread baking. The idea is to shape your hand like a lobster or crab claw, and use it to pinch the dough to help it come together, turning the bowl or dough as you work. This method makes sure that the dough mixes evenly by constantly bringing the outside to the middle.
Checking The Consistency
There are two things to look for when checking the consistency of your masa: it can be too dry, or too wet.
Too Dry:
There are main ways to tell if your dough it too dry:
- The dough is crumbly and not coming together – Your dough is far too dry, add another tablespoon or two of water and keep mixing.
- The dough has come together, and it’s time to test it –
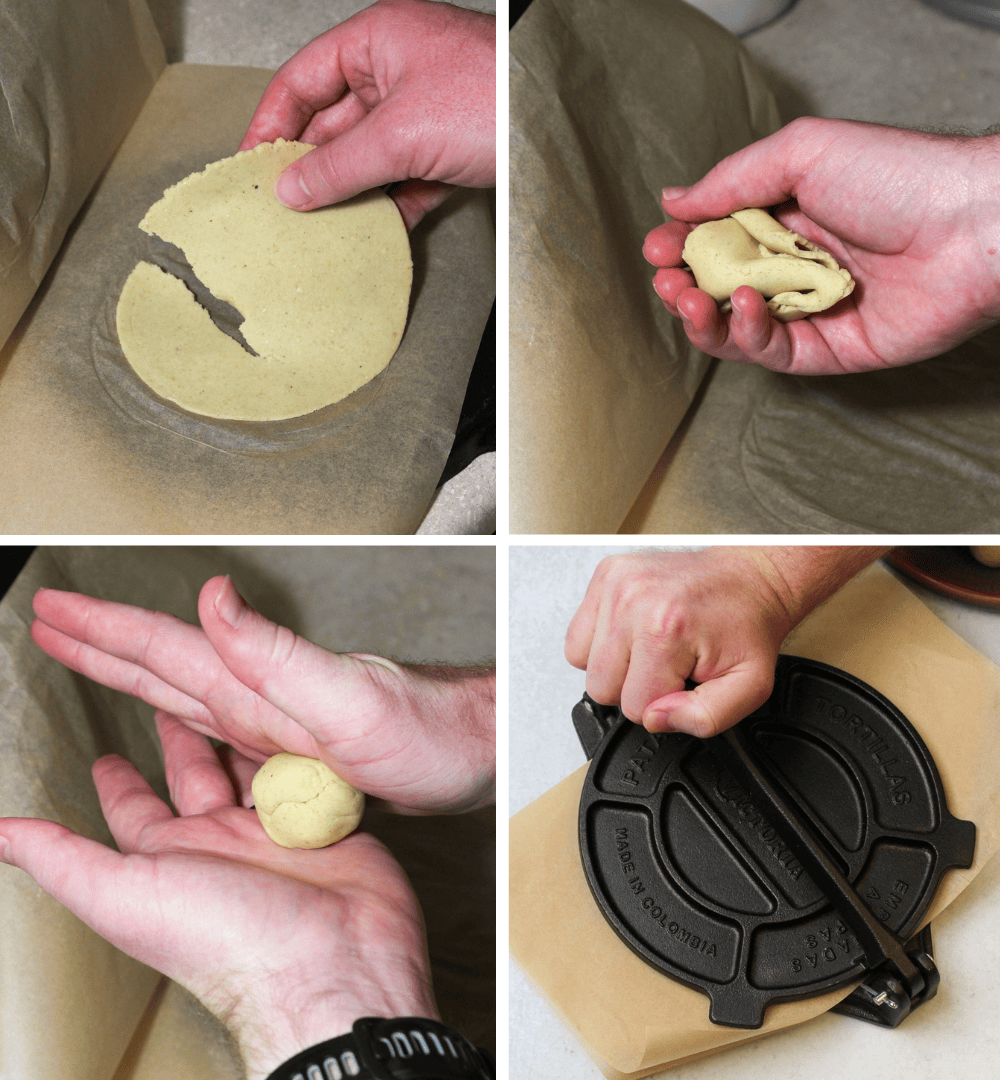
- Rip off a chuck of the dough, roll it into a ball, and flatten it between your hands. If there are cracks around the edge, the dough is not hydrated enough, add another splash of water, mix again, and then re-test.
- If there are no cracks around the edge, your dough is properly hydrated and you’re ready to go. Good job!
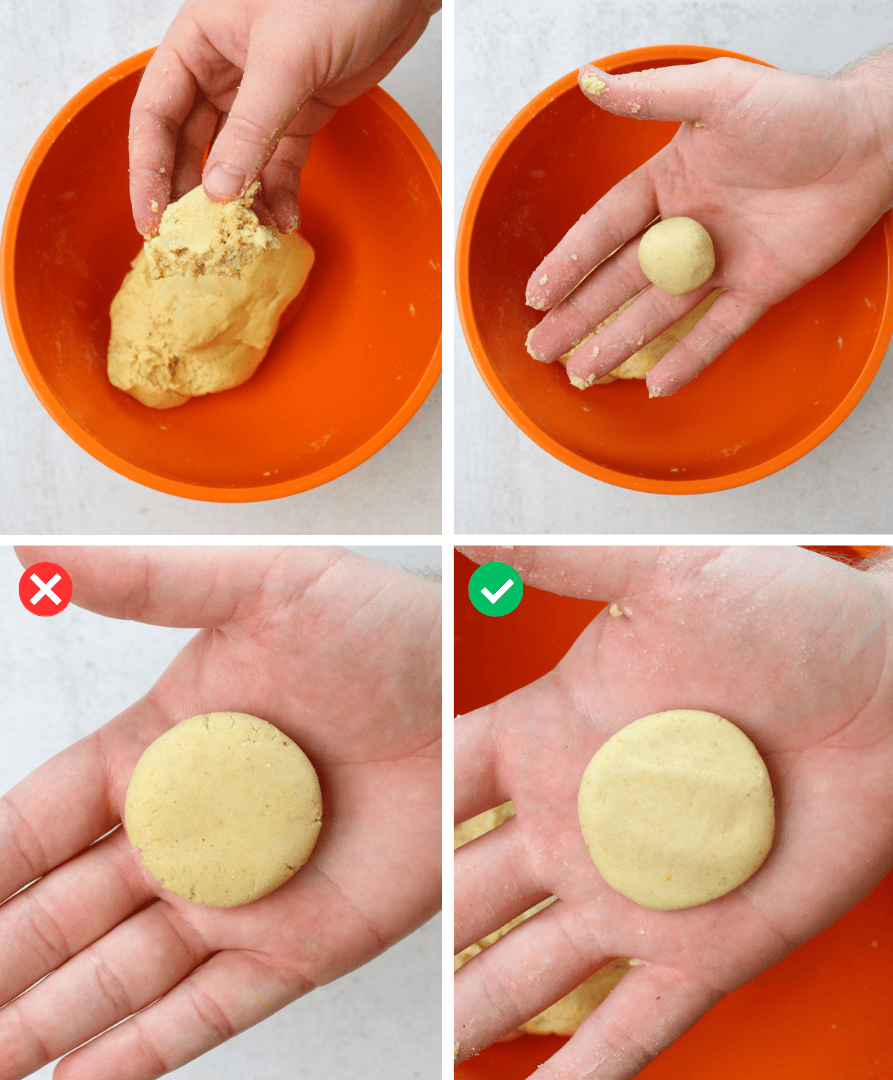
Too Wet:
Knowing if your masa has too much water is easy to tell. If the dough is sticky and hard to work with, it’s too moist, and you need to add another sprinkle of masa harina – add a pinch or two at a time until you get the right consistency.
You will know you have the right consistency when your dough has a play-doh like feel to it. Take your clean hand (the one you didn’t mix with) and press a finger into the dough, if it comes away clean, you’re good to go. If not, the dough needs a little more masa harina.
Getting the right consistency will take some time, but you’ll get better at it with practice. Don’t be afraid to adjust the dough as many times as you need – you can’t overwork it because there’s no gluten. You can even adjust the dough once you start pressing out the tortillas if you find they’re sticking to the press or cracking.
The only downside to adjusting the dough (if you can call it a downside) is that you’ll end up with more masa, and need to make extra tortillas. A downside I’m always willing to live with.
Expert Tips – Making Masa
Sizing The Tortillas
First, a couple notes on sizing:
- I like to make 12 ~4.5-inch tortillas with this recipe. So that’s what the steps are for.
- ~4.5-inch tortillas are street sized tacos while 5.5- to 6-inch tortillas are closer to what you’d get at most restaurants.
- But the basic idea is to split the dough evenly into the number of tortillas that you want.
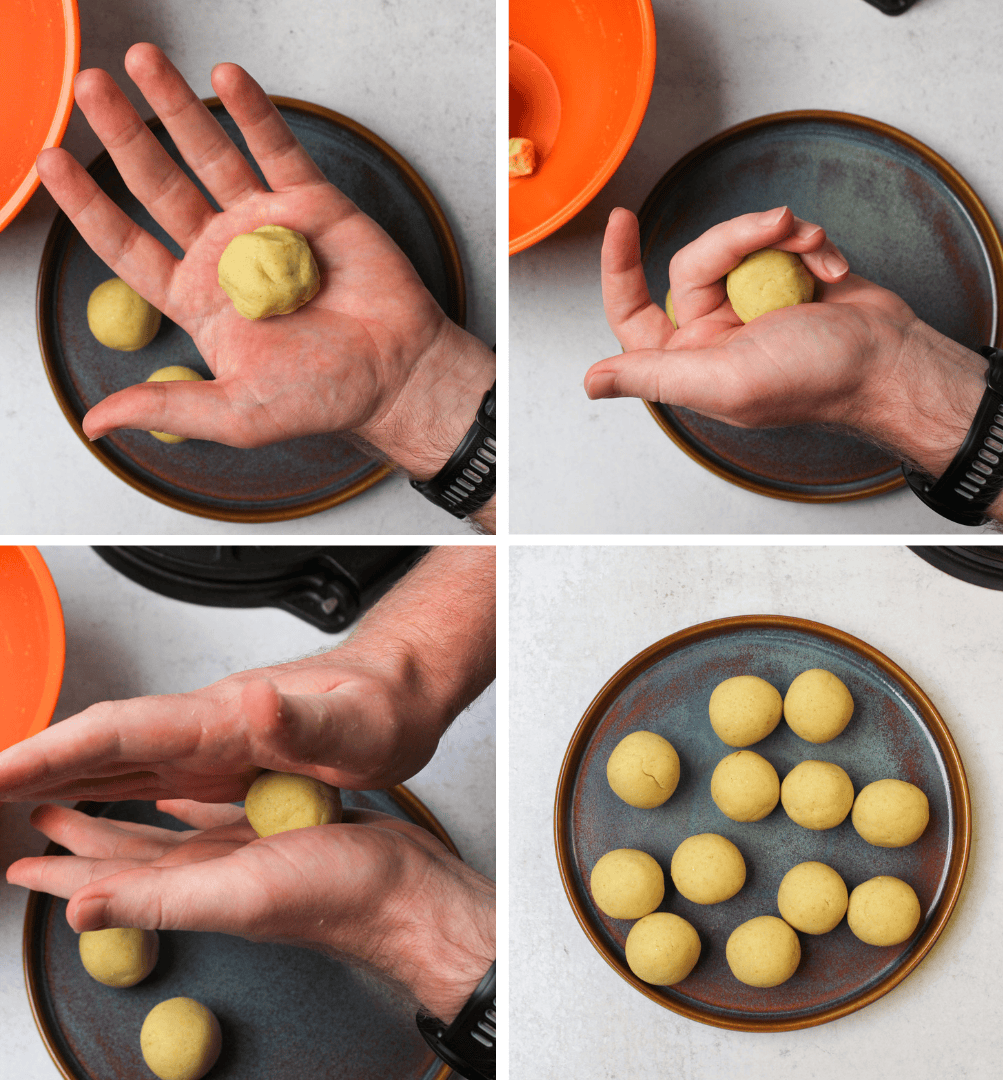
- Pinch off a rough piece of dough. For 4.5-inch tortillas, I aim for something that fits nicely in the palm of my hand, between 25 to 30 grams. Note: aim for ~35 grams if you want to make 5.5- to 6-inch tortillas.
- I then use one hand to roughly shape the dough into a ball.
- Once it’s close enough, I roll it between my palms to make it as round as possible.
- Each dough ball should be about the size of a ping pong ball.
- When you get to your last dough ball:
- If you find you are a little short on dough, steal a little from the largest couple to add. Make sure to round them each out again.
- If you find you have a little too much dough left, add small bits to the smallest couple. Again, make sure to round them each out again.
Pressing The Tortillas
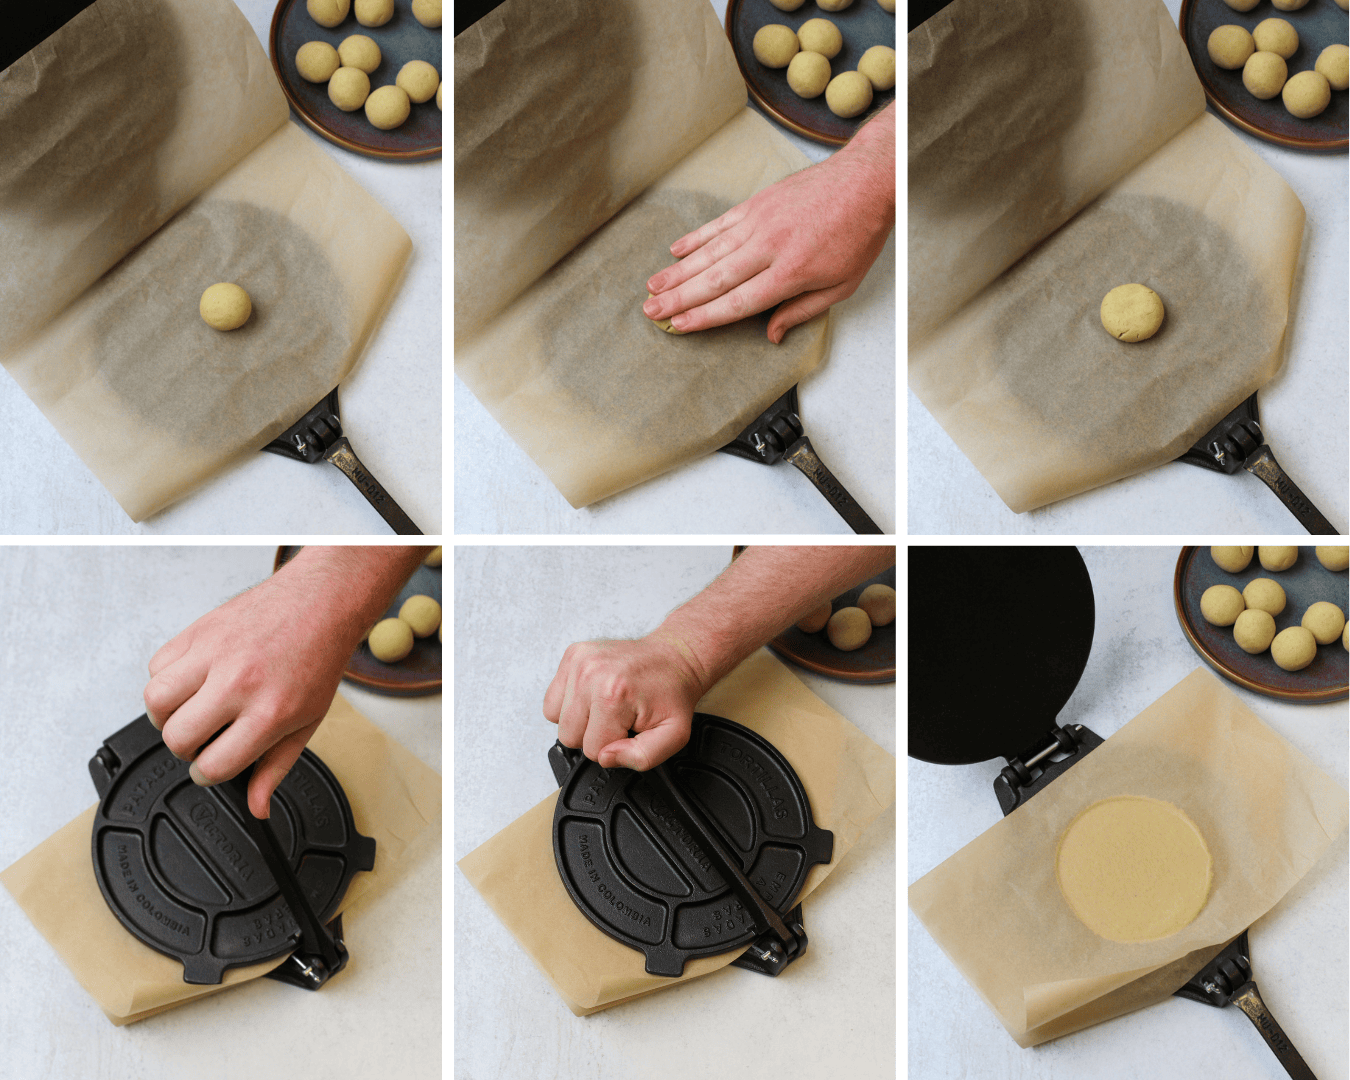
- Line the tortilla press with a large sheet of parchment paper, then place a single dough ball in the middle of the press.
- I like to gently press it down with a couple fingers to help flatten it. This isn’t a necessary step, but I like to make sure the tortilla is centered and doesn’t roll as I try to press it. Also, it’s just kinda fun.
- Gently press the tortilla out, until the press bottoms out, hold for a couple seconds.
- When opening up the tortilla press, you should see a mostly round tortilla with even thickness.
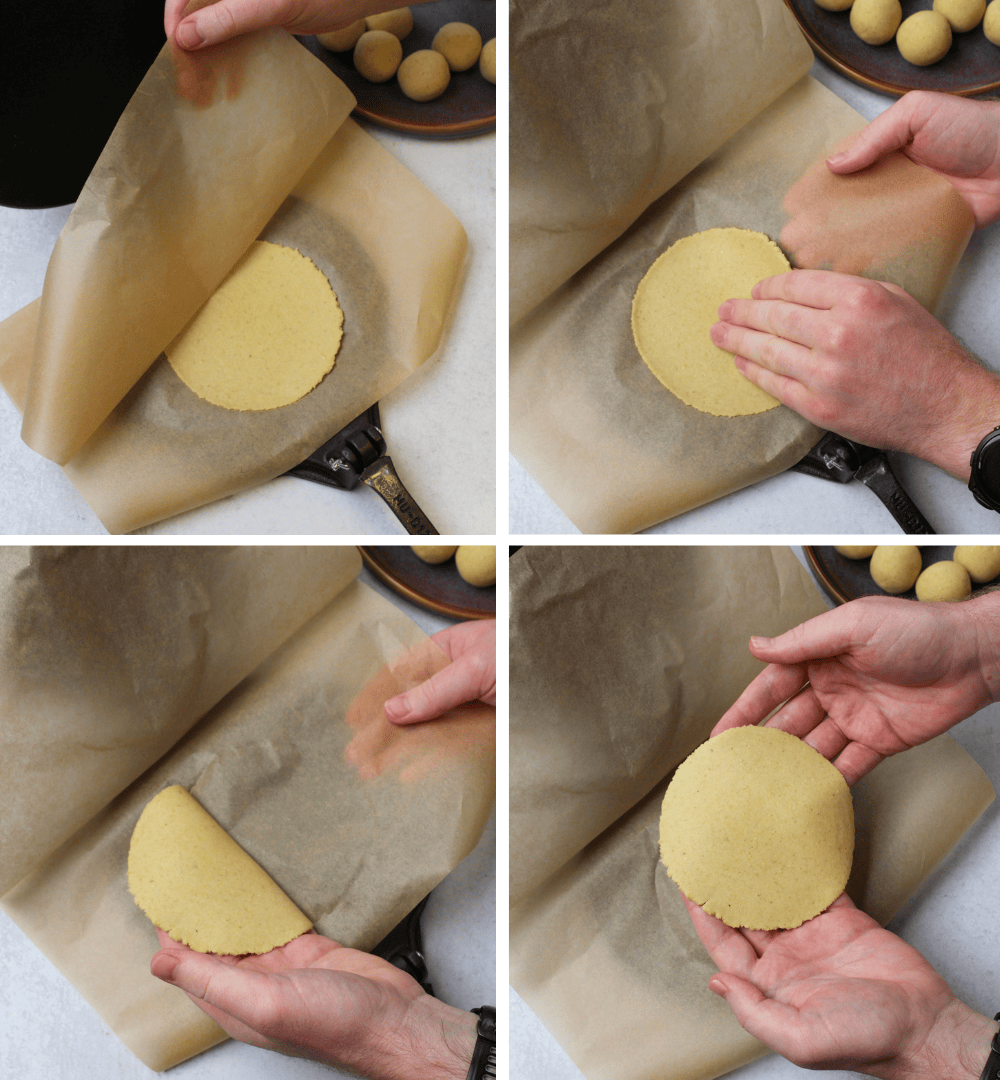
To remove the tortilla from the press,
- Gently pull back the parchment paper. This should be easy.
- Then lift under the tortilla and pull the parchment paper and tortilla away from each other. It should come away cleanly. If the tortilla rips, it’s too wet – see here for troubleshooting.
- Let the tortilla fall into your hand and finish pulling it away from the parchment paper.
- It’s ready to be cooked!
Note: If a tortilla rips while you are removing it from the press, don’t worry! Simply roll it back into a ball, and try again.
Expert Tips – Pressing the Tortillas
Cooking The Tortillas
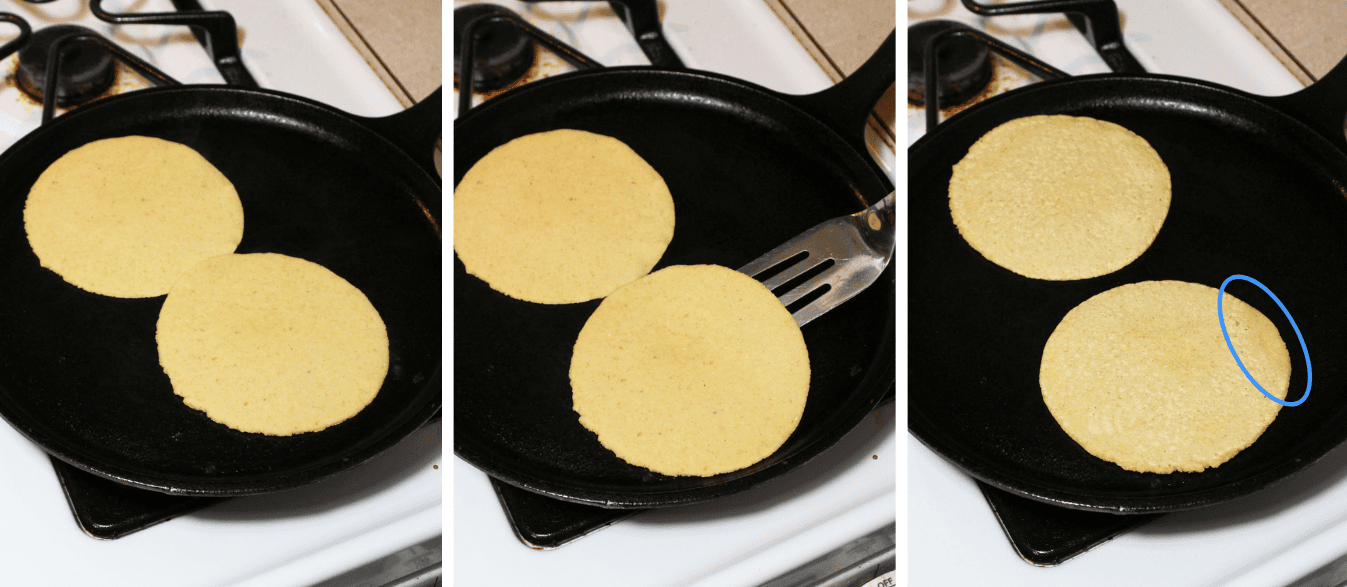
A quick overview: Tortillas are cooked by flipping them twice, so partially cooking the first side, fully cooking the second side, then finishing cooking the third side. And it happens in approximately 30 second intervals. So it moves fast – you don’t want to be doing other things while cooking the tortillas.
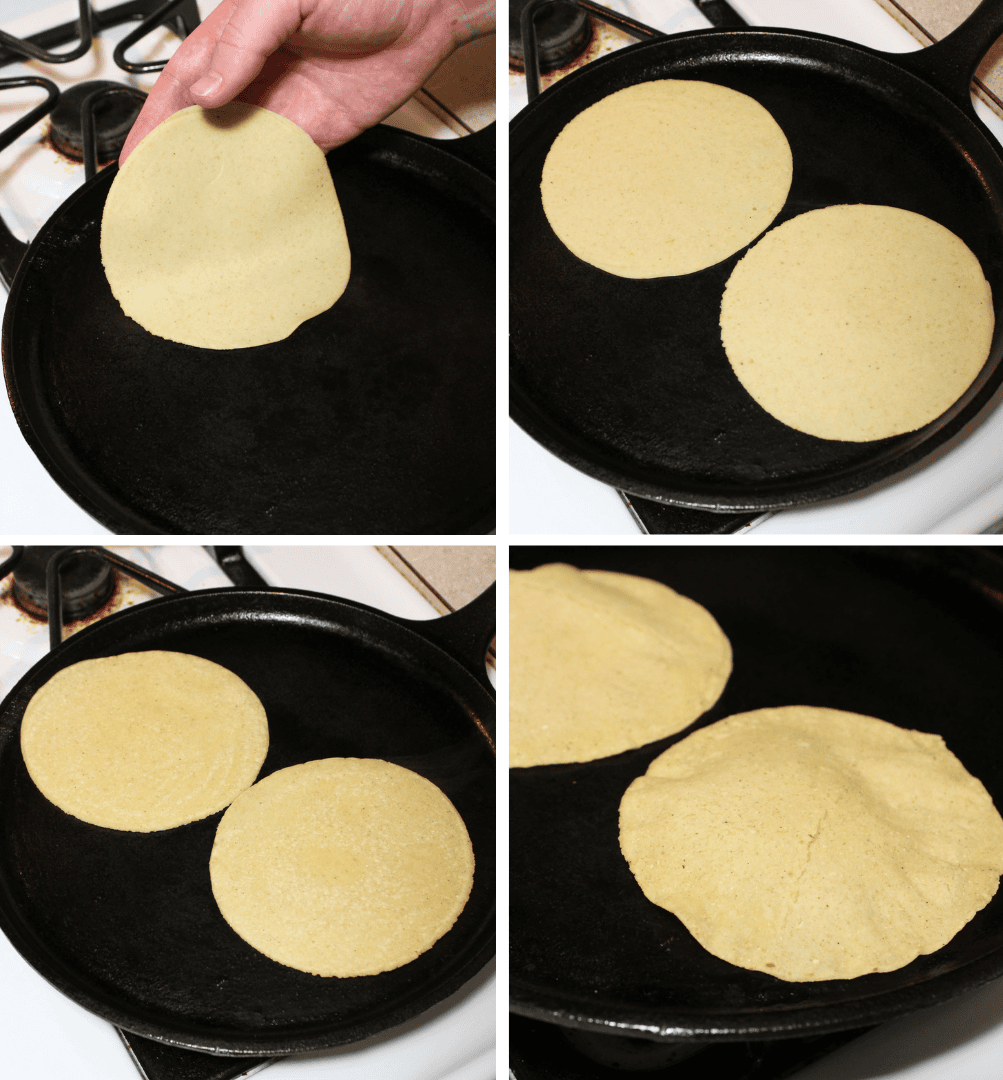
- First heat the cast iron griddle over medium-high heat. Let it heat for at least 5 minutes before cooking, 8 to 10 minutes is better. We want the griddle to be evenly heated – otherwise cooking time will vary from tortilla to tortilla as the pan continues to get hotter.
- Place one or two tortillas on the hot cast iron. Depending on the size of your tortillas and the size of your pan, you may be able to fit one or two. If you put two on, try to keep them from overlapping, they like to stick together, and they won’t cook as evenly. If they do happen to overlap however, check out what to do in the FAQs below.
- After 30 seconds, flip the tortillas. The first side will not be fully cooked yet.
- Let the second side cook for another 30 seconds before flipping the tortilla for the second time. The second side will be fully cooked.
- Finally, let the first side cook again for another 30 seconds. Remove it from the heat and add it to the warming towel.
What to look for while cooking:
- First cook: The tortilla will be ready for the first flip when the edges start to dry out and it no longer sticks to the pan.
- Second cook: We want the second side to cook fully during this 30 second cook. Once flipped, it should have a lighter color from drying during cooking, it may also have some small brown spots.
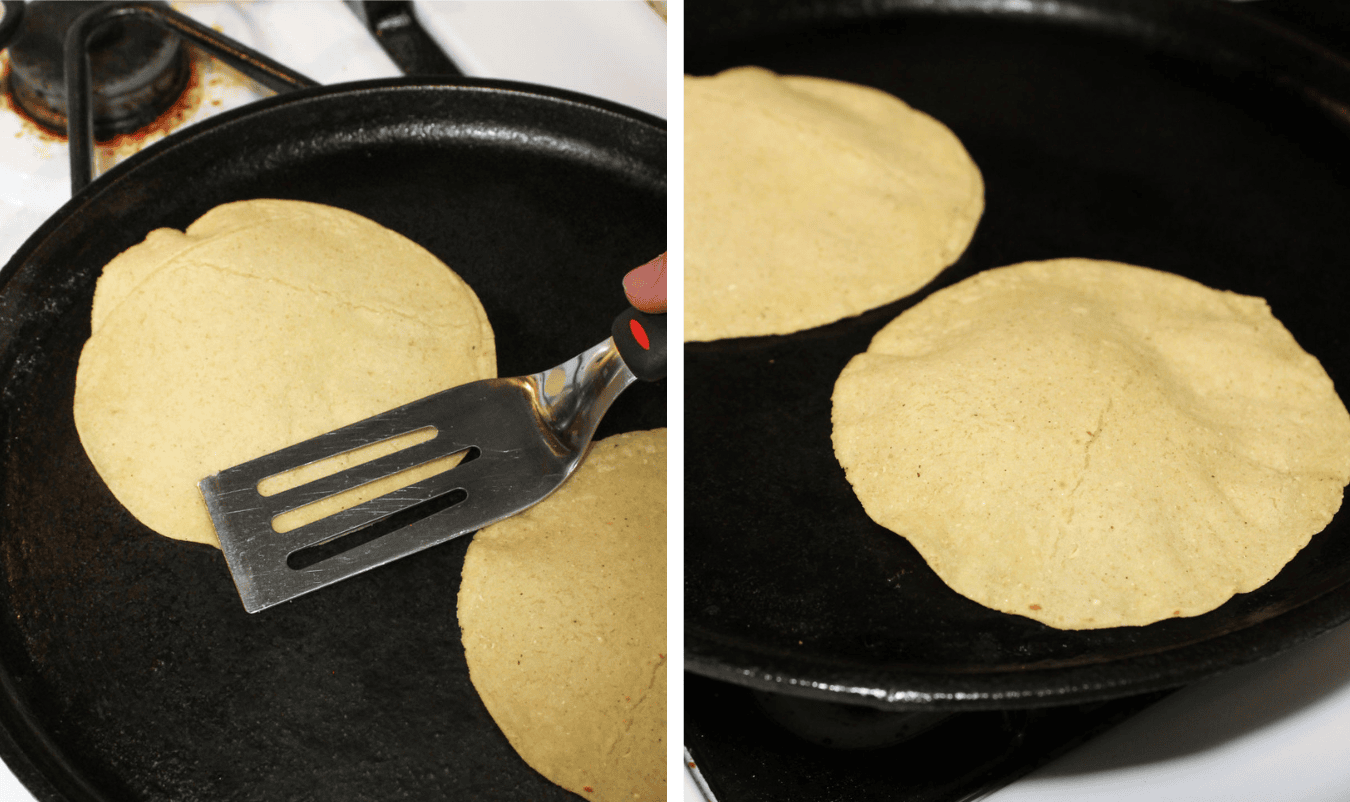
- Third cook: This cooks the first side again, fully cooking it this time. If your tortilla is going to puff during cooking, it’ll be now (see notes below on puffing). The tortilla should be bubbled and have some larger brown spots when it is done cooking.
Notes On Puffing
First off, tortillas puffing up is not necessary for making an incredibly delicious tortilla. Puffing happens when the steam created from cooking is trapped within the tortilla, and there are many reasons this may not happen, so don’t stress over it. However, if you really want your tortillas to puff up because it’s fun, here are a couple tips:
- Press around the sides of the tortilla after the second flip – This helps to trap the steam inside to create the desired puff. See the image below for reference.
- Try a slightly more hydrated dough – the more hydrated the dough, the more steam you will create.
- Take more care while pressing out your tortillas – Instead of just pressing it once, press it, rotate it 180 degrees, and press it again. In order for the steam to be trapped inside and puff up the tortilla, there can’t be any tears in it!
- Raise the cooking temperature – The faster the tortilla cooks, the more moisture there is trapped inside. That means more steam for a proper puff.
Don’t get me wrong, a puff is a sign of an extremely well made tortilla, but it also isn’t necessary at all for making wonderful homemade corn tortillas.
A Reference For Preheating Your Cast Iron Griddle
We use a 10.5-inch cast iron griddle from Lodge on our gas stove. Here is how long it takes to preheat:
|
Preheating Time |
Pan Temperature (F) |
|---|---|
|
6 minutes |
400 degrees |
|
8 minutes |
450 degrees |
|
10 minutes |
500 degrees |
|
Maxed out temp |
~525 degrees |
Keeping The Tortillas Warm
The best way to keep homemade tortillas warm is by wrapping them in a clean kitchen towel. Even if you’re using a tortilla warmer, the tortillas should still be wrapped in the towel.
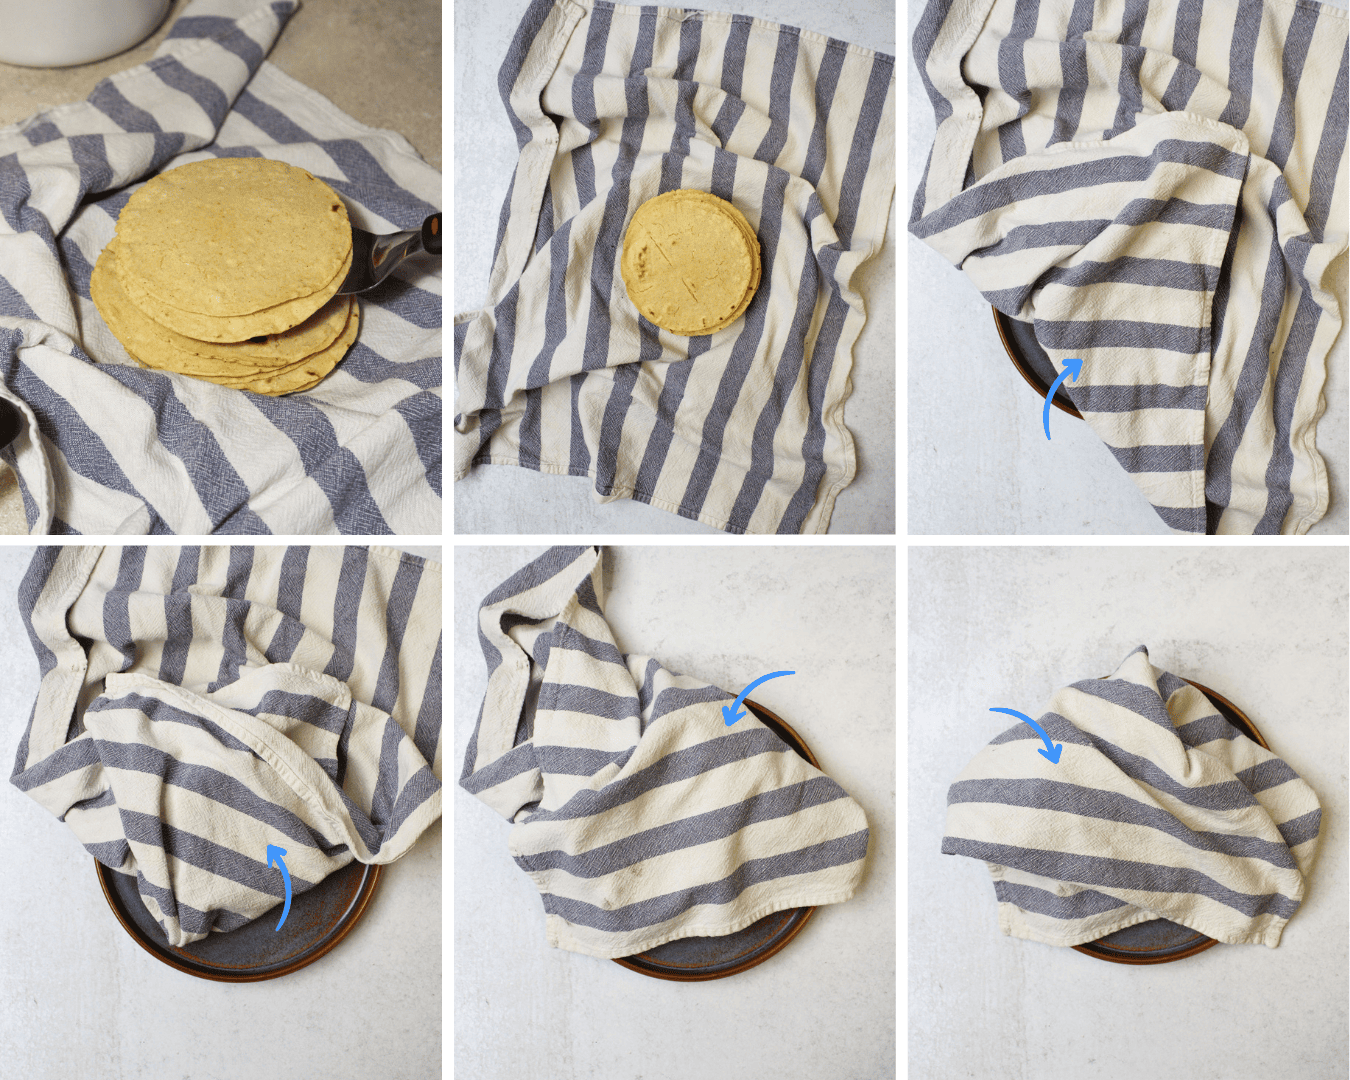
- Lay the kitchen towel out flat, stacking the cooked tortillas in the center as soon as they come off the cast iron pan.
- Keep the warm tortillas wrapped up at all times during cooking and serving.
- Wrap the tortillas by pulling each corner of the towel over them, one corner at a time.
Note: Wrapping the tortillas is a critical step – this allows the tortillas to steam while they sit. Not only does it keep them warm, but it’s the trick to getting super soft and tender homemade corn tortillas. Without this, the tortillas will dry out and easily crack while making tacos.
Storing And Reheating Homemade Corn Tortillas
- Let the extra tortillas cool off before storing.
- Wrap the leftover tortillas tightly in plastic wrap and use within a day or two.
- To reheat, warm for about 60 seconds per side on the cast iron griddle over medium heat. It’s best to wrap the warmed tortillas in a towel (just like when made fresh) for serving. It will help them to stay warm and keep their moisture.
Taco Recipes To Make With Homemade Tortillas
All tacos are better with homemade tortillas, but here are some of our favorites:
- Carne asada street tacos – It’s a classic for a reason. Juicy, flavor-packed carne asada topped with avocado lime crema and pico de gallo.
- Hawaiian pulled pork tacos with tropical BBQ aioli – We always have some of our slow cooker pulled pork in the freezer so we can make these quick and easy tacos whenever we want.
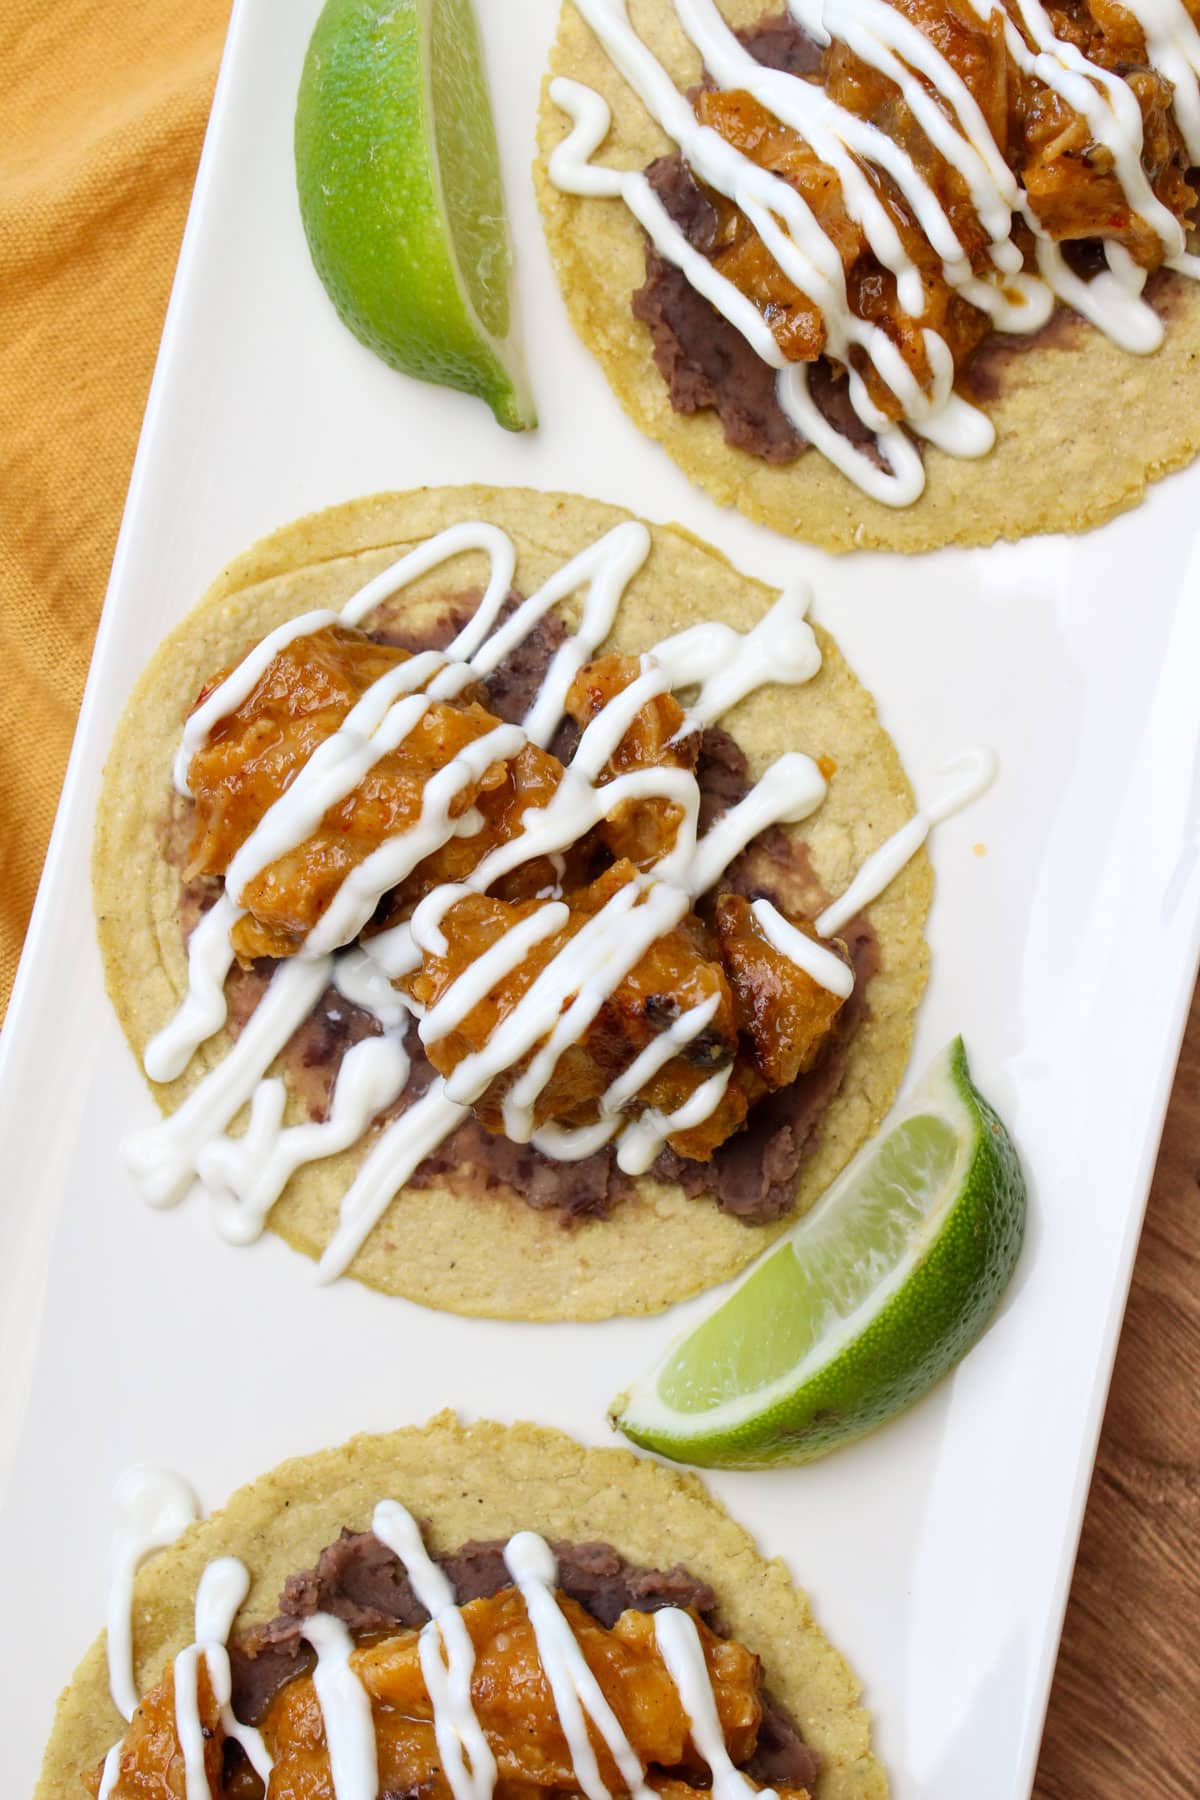
- Crispy pork belly tacos with pineapple chipotle sauce (pictured below!) – Our slow cooker pork belly is cut and seared for the perfect crispy-on-the-outside-tender-on-the-inside texture, then drenched in a spicy pineapple chipotle sauce that is one of the best things we’ve ever made.
- Fried shrimp tacos with chipotle mayo – We love the combination of our spicy homemade chipotle mayo, bright carrot and cabbage slaw, and crispy fried shrimp. Especially with the earthy, bold flavors of homemade corn tortillas.
- Poblano and potato tacos with chili lime crema – Crispy potatoes meet chile relleno in this flavorful vegetarian taco. Topped with a Tajin crema, and we can’t stop eating them.
- Air fryer cauliflower tacos with a spicy chipotle glaze – Crispy cauliflower, a thick, spicy chipotle pepper glaze, pineapple pico de gallo, lime crema, and pickled onion are the perfect toppings for homemade corn tortillas.
- Fried fish tacos with mango salsa – We keep these tacos fresh and bright with our mango pico de gallo and a lime crema to balance the fried, savory, and flake white fish. This is the perfect taco to transport you to the tropics.
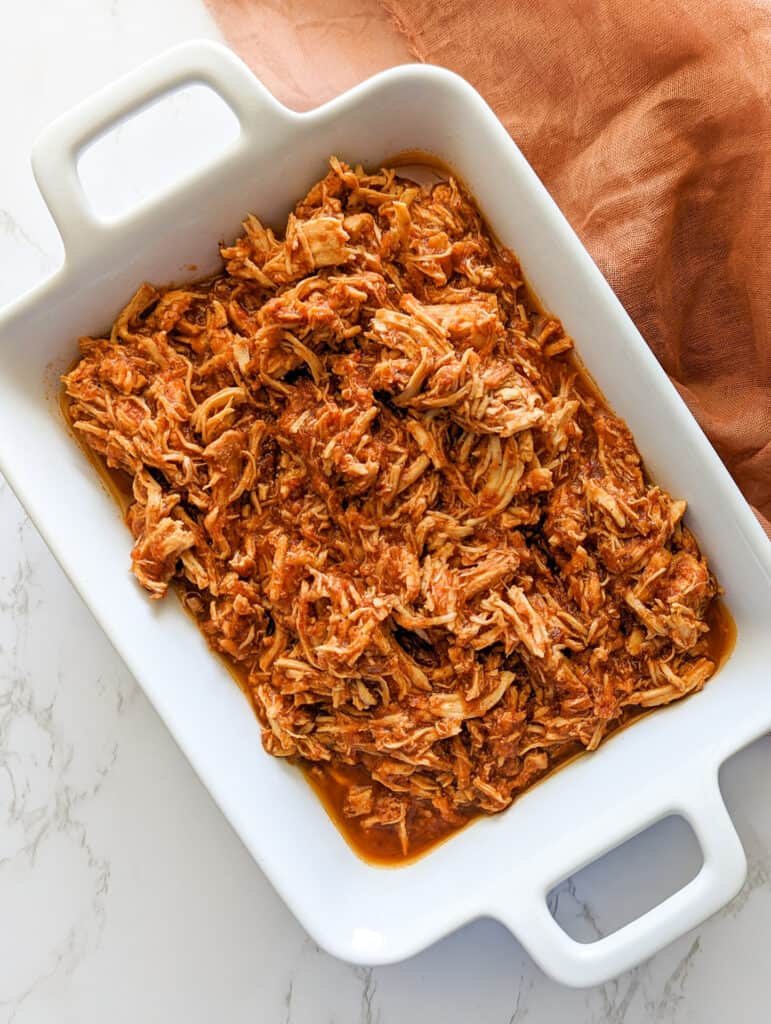
- Slow cooker chicken tinga tacos – These saucy, smoky, and spicy tacos are the perfect easy taco night to enjoy with homemade corn tortillas. Since the chicken is made ahead of time, and there are just a couple other simple toppings, you can focus all your attention on making homemade tortillas!
Homemade Corn Tortillas FAQs
The temperature of the pan for cooking tortillas is decently forgiving, anywhere between 400 degrees F and 550 degrees F will work. Our cast iron pan on our stove over medium heat stabilizes around 525 degrees. At that temperature, 30 seconds per flip cooks the tortillas beautifully.
If your pan is hotter or cooler, you’ll have to adjust your cook times accordingly. But that’s why we always add visual cues to our recipes so that you can learn to cook intuitively.
If you don’t have a tortilla press, we recommend you get one if you care to make tortillas regularly. However, you can use any flat bottomed object to press your tortillas out. But a press will make the job easier and leave you with more consistently sized tortillas (both in diameter and thickness).
While corn tortillas can puff up, and some will claim that it’s necessary for the perfect tortilla, it’s more an indication of technique rather than quality. A tortilla that doesn’t puff up is still perfectly delicious. So no, your tortillas do not need to puff up, don’t worry about it.
Yes! We have tried many brands of masa harina, even high quality brands like King Arthur who we love for all their other flour products. However, Masienda masa harina is by far the best. It’s easier to work with, it provides more consistent results, and it tastes better (it has a richer corn flavor).
Plus Masienda works with and supports its network of farmers, their masa is certified non-GMO, and they source materials that aren’t treated with pesticides and maintain a chemical-free post-harvest handling practice – all of which we love! Learn more about them here.
If you are cooking two tortillas at once and they happen to overlap while placing them onto the pan, don’t worry, and don’t try to separate them right away, they like to stick together! Simply wait 30 seconds for the first side to cook. Before flipping, gently lift the top tortilla, it should come away easily now that they are partially cooked.
However, the part that overlaps will be less cooked, you may need to give it a couple extra seconds to cook fully after the last flip.
That’s simple, practice! The more you make them, the better you’ll get at it. While making good corn tortillas is easy, making the perfect tortilla is a much longer, but very delicious, journey.
More Mexican Recipes To Make From Scratch
Love this recipe? You may enjoy these recipes, too:

Tell us what you think!
We hope you enjoy this recipe! When you try it out, please leave a review and a star rating in the comments below. Happy cooking! – Nicole and Alex
FREE EMAIL GUIDE
Ultimate Game Day Guide
5 days of crowd-pleasing recipes for entertaining this football season!
Follow us on social:
How To Make Homemade Corn Tortillas For Tacos
Save this recipe!
Equipment
Ingredients
- 135 grams yellow masa harina a heavy cup
- 200 grams warm water a light cup
- 3 grams fine sea salt ½ teaspoon
Instructions
Mix the Masa
- Combine the masa harina, warm water, and salt in a mixing bowl.
- Mix by hand until well combined, about 4 to 5 minutes. The dough will start as a sticky mess and slowly come together to form a roughly shaped mass. It should be about the texture of play-doh.
- Check the hydration of the masa by ripping off a small chunk, about the size of a ping pong ball, and rolling it into a ball. Flatten the ball between your palms, there should be no cracks along the edge. If there is, add a splash more water and continue mixing until it's absorbed.
Sizing the Tortillas
- Pinch off a small chunk, about the size of a ping pong ball again, roughly 25 to 30 grams, and roll it into a ball.
- Repeat this until all the dough is divided and shaped.
Pressing the Tortillas
- Place a single dough ball in the middle of a parchment-lined tortilla press and gently press it down to flatten it slightly.
- Then use the press to shape the tortilla. Fully press until it bottoms out and hold it for a second or two.
- Open up the tortilla press and peel back the parchment paper. This should be easy.
- Then lift under the tortilla and pull the parchment paper and tortilla away from each other. It should come away cleanly.
- Let the tortilla fall into your hand and finish pulling it away from the parchment paper.
Cooking the Tortillas
- First pre-heat the cast iron griddle over medium-high heat.
- Place one or two tortillas on the hot cast iron. Depending on the size of your tortillas and the size of your pan, you may be able to fit one or two.
- After 30 seconds, flip the tortillas. The first side will not be fully cooked yet.
- Let the second side cook for another 30 seconds before flipping the tortilla for the second time. The second side will be fully cooked.
- Finally, let the first side cook again for another 30 seconds. Remove it from the heat and add it in a clean kitchen towel to keep it warm.
Keeping the Tortillas Warm
- Lay the kitchen towel out flat, stacking the cooked tortillas in the center as soon as they come off the cast iron pan.
- Wrap the tortillas by pulling each corner of the towel over them, one corner at a time. Keep the warm tortillas wrapped up at all times during cooking and serving.
- Serve warm, with your choice of taco fillings!
Notes
Nutrition
If you have any questions regarding the information presented in this post, please refer to our Nutrition Disclaimer here.
FREE EMAIL GUIDE
Ultimate Game Day Guide
5 days of crowd-pleasing recipes for entertaining this football season!

These are the best tortillas I’ve ever had! I’m so thankful Alex started making these from scratch because the corn tortillas from the store were always disappointing. Now we can have restaurant style taco nights at home whenever we want, and the flavor is truly authentic!